Exporting cameras from Maya into Unreal can be pretty cumbersome and so far I've been trying to search online for answers and different methods. Some methods found are useful while others are not. So I came up with a simplified way of exporting and I'll note it down here in layman terms. (Main reason for doing so is because it was hard to understand what the professionals on forums are saying.)
So without further ado here are the steps:
In Maya, imagine your hand-animated camera is named "CAM" and make sure you're at frame 1.
Step 1 - Duplicate CAM and add an "_export" to the name for identification.
Step 2 - Parent CAM_export to CAM. (Parent_CAM being the child of CAM.) This step would "zero" out the transformations in CAM_export's channel box naturally.
Step 3 - Rotate CAM_export in the Y-axis by 90 degrees.
Step 4 - Unparent CAM_export from CAM. This step would "give back" the original transformations to CAM_export but with an addition of 90 degrees to the value of Y-axis.
Step 5 - Parent constraint CAM_export to CAM so that CAM_export will "absorb" the keyed attributes of CAM. ("Maintain Offset" checked)
Step 6 - [Key > Bake Animation] for CAM_export. ("From Channel Box" checked and set Start/End time range, as we only need to bake translate and rotate values.)
Step 7 - [File > Game Exporter] CAM_export into the desired Unreal Project folder as FBX. (Animation checked)
Moving over to Unreal:
Step 1 - Cinematics > Add Level Sequence
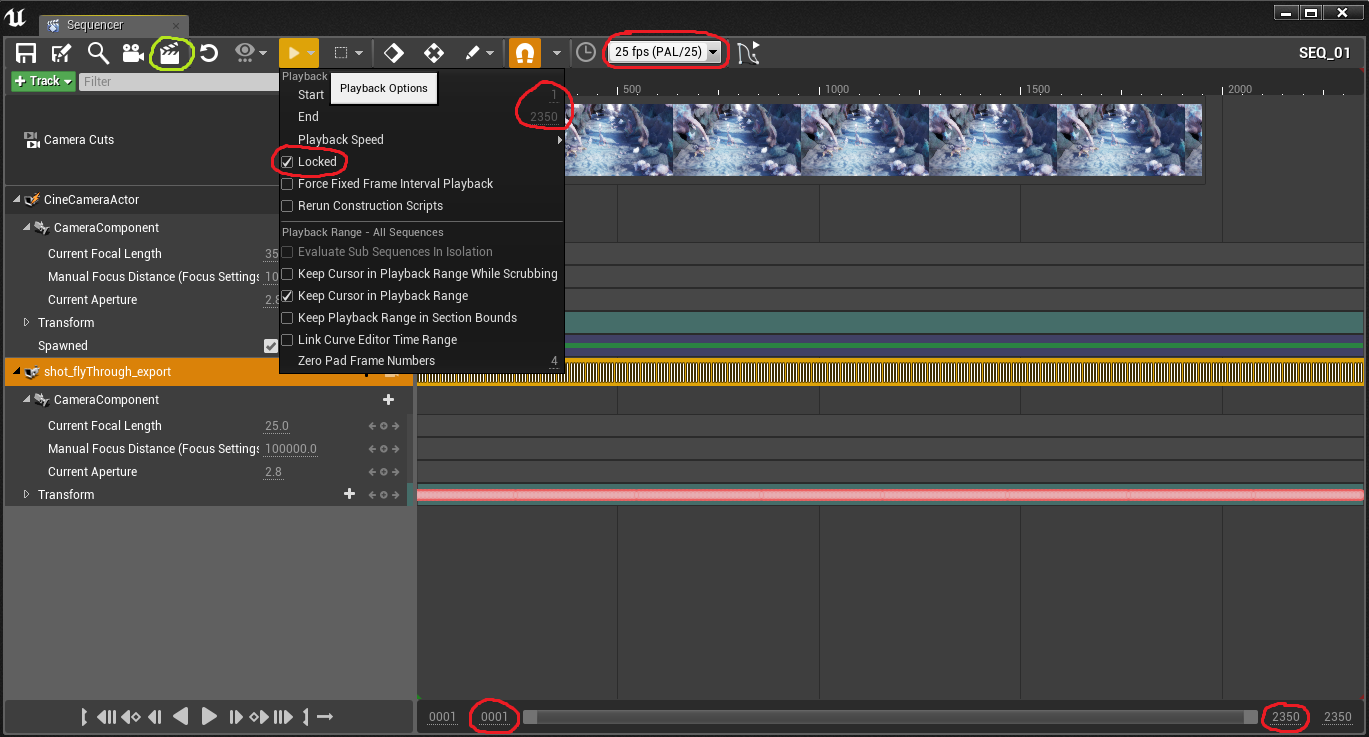
Step 2 - In the Sequencer, change the fps to 25fps. (My usual framerate.).
Step 3 - Set your desired start and end values in the timeslider,
- followed by going to playback options, setting the Start and End values again.
- Lastly, check the locked option.
So without further ado here are the steps:
In Maya, imagine your hand-animated camera is named "CAM" and make sure you're at frame 1.
Step 1 - Duplicate CAM and add an "_export" to the name for identification.
Step 2 - Parent CAM_export to CAM. (Parent_CAM being the child of CAM.) This step would "zero" out the transformations in CAM_export's channel box naturally.
Step 3 - Rotate CAM_export in the Y-axis by 90 degrees.
Step 4 - Unparent CAM_export from CAM. This step would "give back" the original transformations to CAM_export but with an addition of 90 degrees to the value of Y-axis.
Step 5 - Parent constraint CAM_export to CAM so that CAM_export will "absorb" the keyed attributes of CAM. ("Maintain Offset" checked)
Step 6 - [Key > Bake Animation] for CAM_export. ("From Channel Box" checked and set Start/End time range, as we only need to bake translate and rotate values.)
Step 7 - [File > Game Exporter] CAM_export into the desired Unreal Project folder as FBX. (Animation checked)
Moving over to Unreal:
Step 1 - Cinematics > Add Level Sequence
Step 2 - In the Sequencer, change the fps to 25fps. (My usual framerate.).
Step 3 - Set your desired start and end values in the timeslider,
- followed by going to playback options, setting the Start and End values again.
- Lastly, check the locked option.
Step 4 - Create a new camera. (Click on the Camera icon beside the magnifying glass.)
Step 5 - Right click on the newly created CineCameraActor and click import.
Step 6 - Import the CAM_export.fbx file. (Uncheck "Reduce Keys" in the import options.)
Step 7 - With the maya camera now imported in to the Unreal Sequencer, you may delete the CineCameraActor.
Step 8 - Click the + sign on the Camera Cuts layer and select the CAM_export as the existing binding.
Step 9 - Render
And there you have it, idiot proof method of exporting animated cameras from Maya into Unreal without tearing your hair out!